Friday, 20 December 2013

Vintage Leather Purse, Part 3

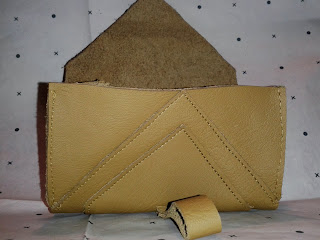
Finally managed to find some time after work to sew the purse together, but I haven't even  put the Christmas tree up yet! 

The final outcome I have to say is really good, considering this is my first leather purse! There were of course some issues. I used my Singer 201k with a 14 leather needle which went through it like butter, but it didn't like suede on suede. So suede on the presser food and feed teeth. It kept getting stuck, so I had to sew half way then go back and start the part I had not done, the amount of times I had to re cut was mad. My other issue I have with it is that the edges look so rough, but I have done my research in this are, but I still have NO idea how to finish the edges off. 


Saturday, 14 December 2013

Vintage Leather Purse, Part 2

I have found little time the past 2 weeks to do anything, so when I finally found some I only managed to get it all cut out. What I'm a little miffed about is not finding the time to get anything to sort the edges out! So had to use my scissors to cut all the edges at a 45 degree angle. I cut the pattern out using a knife as it gives a straighter edge and its looks ok, just worried that it may be a little smaller after it's all sewn up. Lucky I have another 7foot just incase it goes wrong.


Saturday, 30 November 2013

Vintage Leather Purse, Part 1

With Christmas round the corner I have been meaning to make my good friend a leather purse. Its been on the books for 4 months, but I know she likes mustard yellow, not the easiest of colours to find for the right price. So after months of looking I managed to find some of decedent thinkness off Ebay that is massive but is more of a dirty mustard than a bright mustard.

I took my inspiration from a purse I pinned on Pinterest.


This will be the second purse I have made but this time I had to draft my own pattern. 


I usually play around with patterns using pattern paper first and construct it together with masking tape.


From constructing this together I have decided that in the larger section the sides need to be wider and maybe the smaller section could do with being made wider when it is open.


Sunday, 10 November 2013

Doggy Pjs

With the nights getting colder and Beau being a really late molter (she has just got her summer coat), it's time to make her and Angus some pjs. Yes you might laugh but Beau has been jumping on the bed in the middle of the night the night for cuddles and warmth.


Without Pjs we wrap them up.


I made my own pattern from a hoodie I brought Beau 3 years ago, this is the 3rd time i made Beau heres, so my 4th were for Angus. I always have issues with the arms not being in the right position, but I re drafted the pattern for the arms and they look better on Angus's pjs.

This was the 2nd pjs that i made.

This was the material I choose. I nice fleece.


As you can see the arms look ok when she leans forward.


And when she sits down.


I did a higher neck with some button detail, She likes the higher neck as its cosy.


Angus in his Pjs, the arms are better, but i did have to make the bottom a 
little shorter due to him being a boy and going to the loo.


Matching doggies.


Saturday, 26 October 2013

Door Stop

If you read my other blogs you may know that I have just adopted another Shar Pei called Angus. Angus managed to shut him self in the bathroom this week for a few minutes, now even though the bathroom door doesn't shut properly and Beau was trying to get him out he did do some damage to his claws that we don't want to happen again, so I decided to make a door stop to keep the door open.

As it was last minute I had to get some material from the market, it was plaid! Now pattern matching is something that I am not very good at, so I decided not to even bother and went as far as making sure that i cut it all the same way. I did try to match up the bottom and top, but to my surpise it matched, take a look and tell me what you think.


This is my original door stop that I brought from ebay and measured 
it so I had a pattern.


This is the one I made


This is the bottom, not as well pattern matched or as tidy but looks ok.


This is the handle and even though i know it should be black so it
looks more plaid its still ok.


                       Side                                                                               Seam.


Saturday, 12 October 2013

Baby Bunting

My Nephew in laws girl friend has just given birth to a baby girl called Poppy so I decided to be a little different in the usually baby gifts and make her some Bunting. It took about 4 hours but that's only as i tried really hard not to cock it up.


All the triangle are double sided with 3 different baby buttons at each top corner to finish it off.


This I found tricky, the letter were cut from felt and then stitched using my Singer 201, No problems other than going round the corner, so there are a few cock up, but other than that not a bad job for my first attempt.


After I finished I put it on my wall to see how it looked with just the bias binding, it looked awful, unfinished and just not very proffessional. So I decided to make a bow, and the fact the one side is longer than the other was accidental, I just cut and sewed the material and when constructing the bow to see how much to cut off one bit was longer than the other, but it looked better and I think finishes it off.


Friday, 30 August 2013

Rock 'n' Roll Collar

Its been 2 weeks as I have been away, also fostering a new dog which takes up a bit of time and back at work (booo).

This was another collar that I made, a bit by accident really. On ebay you can get some studs from China and I thought I would get them as they are cheep and try them out. I was impressed, nice colours and cuts through the leather dead easily. My only issue would be that when Beau scratches the paint may come off.